In previous blog I wrote about How/Why you Should use Databases, resulting in many postive reviews from you guys. So, On Demand, today we are exploring a new topic with new energy, let’s start today’s session.
In abstract, we are gonna cover how you could host n8n on your own VPS. For that we are gonna use Oracle Cloud VPS for this Setup. Oracle Cloud VPS have a Free Tier plan too, which you can use for Indefinitetly.
The idea of hosting your n8n for youself has many pros and cons for specific use-cases. In our case we will be doing testing’s, building new workflow’s. Hence, Our workflow might becomes larger and complex, you’ll need to have a seperate n8n hosted server where you can use n8n to its fullest (constraint by only your server limitation’s).
For those who don’t know me, Hello there it’s you’re tech guide, goes by the nickname axiomcompute. Let’s start today’s session.
Why You Should Self-Host n8n on a (Oracle Cloud VPS)
As stated earlier, In n8n cloud you will reach your limit sonner or later, here are the facts:-
- Hard to customize deeply (apart from n8n)
- Workflow Execution Limitations
- Not ideal for production-grade workflows
- Cloud gets expensive really fast
Running n8n on your own VPS gives you:-
- Freedom to Build anything
- Lower cost (₹400-₹800/month)
- Better scalibility
- Full control over both VPS and n8n.
Things you’d need before setting up n8n on VPS
Minimum VPS Requirements for Running n8n
- 1GB RAM
- 1 CPU core
- Ubuntu 22.04 VPS
- Basic linux command knowledge (I will guide you even if you don’t know it.)
Recommended VPS Requirements for Running n8n in Our Use-case
- 2GB RAM
- 2 CPU core
- Ubuntu 22.04 VPS
- My tutorial
Step 1 — Configuring Oracle Cloud VPS
Let me be clear here before moving onto buying the VPS, You can use FREE TIER of oracle cloud for idefinite amount of time, for absolutely free.
Now, to simply setup the VPS you need to sign-up on ORACLE CLOUD using your real details, then they may ask you to provide your legal document’s and a autopay request (you don’t have to pay just accept the autopay, you can always cancel it later without any penalty).
After some verifications when your account got created, you have to create an instance inside it according to the specification’s listed above, Operating System and Hardware Specs are called Image & Shape here in Oracle Cloud as Shown in image below.
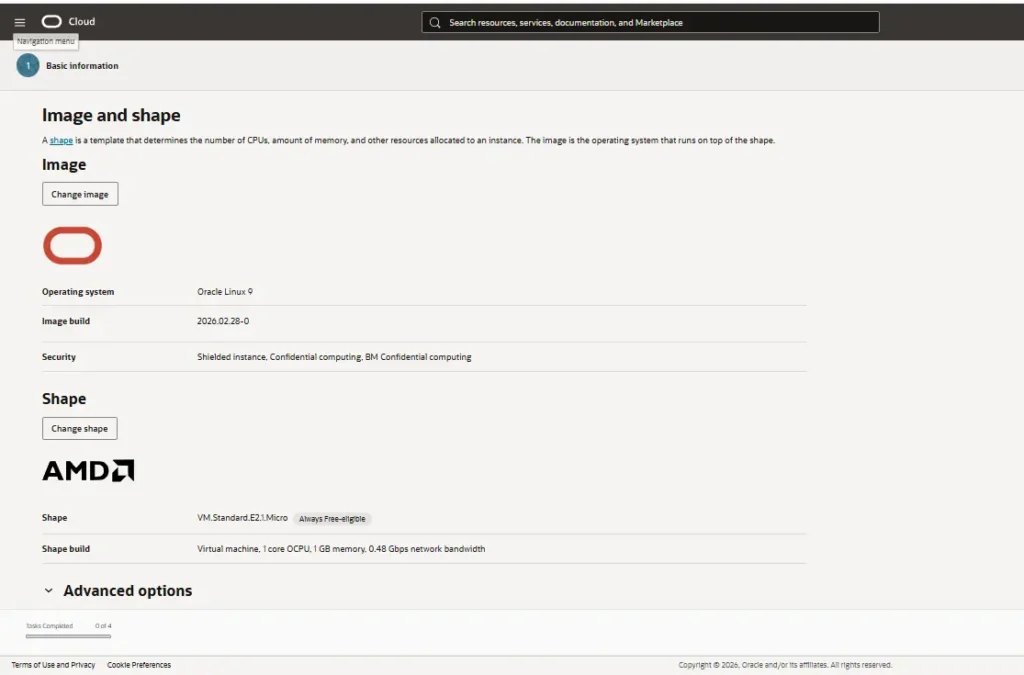
Afterwards click next, remember I have taken the screenshot before I choose the image & Shape. you must choose image & shape as specified above.
Click next, then switch the security (shielded instance) option on.
Afterwards, In networking section, leave everything default, just choose a name, then in advance options generate a pair of SSH KEYS—this is absolutely important for you to access the instance without sign-in oracle account.
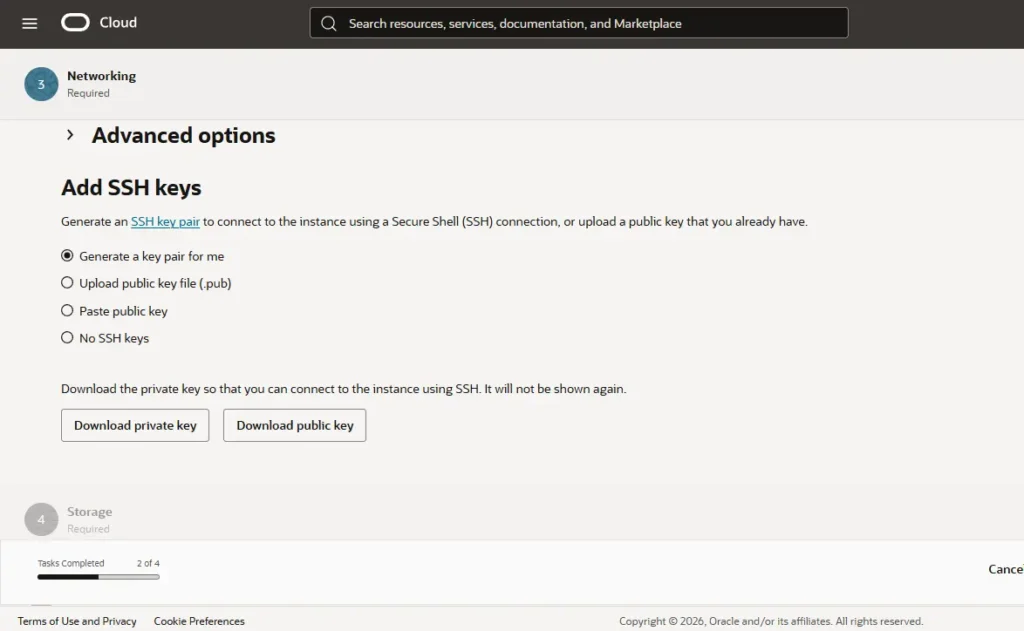
Download both private & public key then click next.
Leave everything default in storage, then click next, review it—then create the instance.
Note:- just to be sure here, sometimes oracle instances networking rules gets messed up, hence blocking the website access and possibly ssh access too, In that case you should consult these Official Oracle Docs.
You should try accessing your instance through SSH from your computer example code is given below.
ssh root@your-server-ipNote:- you will find the IP address of your server inside instance, copy it and replace it with “your-server-ip”.
Step 2 — Install Docker (Required for Running n8n Properly)
After setting up the instance we are going to install docker in it, and then we will install n8n inside it. The reason’s for doing so is simple,
- Setup will be clean
- n8n updates will be easier
- managing the n8n on server will be considerably easier
Open your terminal, Enter inside your server through SSH. then paste these codes given below,
apt update && apt upgrade -y
apt install docker.io -y
systemctl start docker
systemctl enable docker
This code will install docker in your server, afterwards, paste the code from below.
docker --versionThe above code will check the version of the installed Docker and acts as a signal that it is successfully installed.
Step 3 — Install n8n, Start Docker, Expose it to web
Since Docker is installed we shall proceed to install n8n inside the docker, do some routing’s then access the n8n on web.
mkdir ~/n8n && cd ~/n8nThe above code will make a directory for n8n.
mkdir n8n_data
sudo chown -R 1000:1000 n8n_data

This will prepare data folder's where the workflow etc.. will be stored.
then run this,

nano docker-compose.yml
Afterwards, paste the below code in the text editor,
version: '3.8'
services:
  n8n:
    image: n8nio/n8n:latest
    restart: always
    ports:
      - "5678:5678"
    environment:
      - N8N_SECURE_COOKIE=false  # for SSL/HTTPS
    volumes:
      - ./n8n_data:/home/node/.n8n
Then press Ctrl+O, Enter then Ctrl+X.
Then run this code,
docker compose up -dNow, Run n8n using Docker,
docker run -it --rm \
-p 5678:5678 \
-e N8N_BASIC_AUTH_ACTIVE=true \
-e N8N_BASIC_AUTH_USER=admin \
-e N8N_BASIC_AUTH_PASSWORD=strongpassword \
n8nio/n8n
After this you shall see your n8n being live on this link,
http://your-server-ip:5678As usual replace the server IP with your original IP.
Note:- when you open your link, you will see a webpage where n8n will STOP you from procedding further, which confirm that n8n is successfully installed and is working. This will happen because n8n won’t allow it get accessed from HTTP. So we will install HTTPs in later sections.
The above code is not production ready solution so we will fix that before proceding further.
Paste the code given below, that’s it.
docker run -d \
--name n8n \
-p 5678:5678 \
-e N8N_BASIC_AUTH_ACTIVE=true \
-e N8N_BASIC_AUTH_USER=admin \
-e N8N_BASIC_AUTH_PASSWORD=strongpassword \
n8nio/n8n
Step 4 — Setting up Domain
Important:- If you do not have domain you can directly skip this section, proceed to install HTTPs directly.
Instead of using https://223.234.22.11:5678 to access the website each time, which, certainly does not look professional. So what we’ll do is route this to your domain e.g. n8n.yourdomain.com, follow the step’s properly here,
apt install nginx -y     #install this from root folder inside server, enter using ssh

nano /etc/nginx/sites-available/n8n
After pasting this, you will get a text editor inside your terminal, paste the code (given below) in that editor.
server {
    listen 80;
    server_name n8n.yourdomain.in;

    location / {
        proxy_pass http://localhost:5678;
        proxy_set_header Host $host;
        proxy_set_header X-Real-IP $remote_addr;
    }
}
Note:- replace this “n8n.yourdoamin.in” wiht your real website domain.
After pasting this press Ctrl+O, Enter then Ctrl+X.
Enabling the nginx,
ln -s /etc/nginx/sites-available/n8n /etc/nginx/sites-enabled/
systemctl restart nginx
Important:- Go to your domain Provider>DNS settings>Add an A Record there, you can get the IP from your Oracle Cloud Instance (same as one which you have in your SSH).
Step 5 — Adding SSL using Let’s Encrypt
We will be using Let’s Encrypt.
apt install certbot python3-certbot-nginx -y
certbot --nginx -d n8n.yourdomain.in
After doing this you can access your website on this domain,
https://n8n.yourdomain.inStep 6 — Using Persistent Storage
We are enabling persistent storage in docker, you may skip this step.
Docker, by default, delete’s data when container is removed.
So, paste this code from below,
docker run -d \
--name n8n \
-p 5678:5678 \
-v ~/.n8n:/home/node/.n8n \
n8nio/n8n
This way your data inside n8n can be safe.
Conclusion
Phew! ~ So this was a complete guide to help you set-up n8n for yourself on our own server. make sure you read this whole blog one or two times before attempting yourself, If you happen to get stuck in some step, my personal email is in contact us page. So this was it, keep learning, keep going. meet you in next blog.