When I opened n8n for the first time, I did what most people do — I stared at the node panel, saw 400+ integrations, and immediately felt like I’d made a mistake even trying. Google Sheets, Notion, Airtable, Slack, HubSpot, OpenAI, Twilio, Stripe… every icon screaming at me. Two hours later I closed the tab without building anything. Sound familiar?
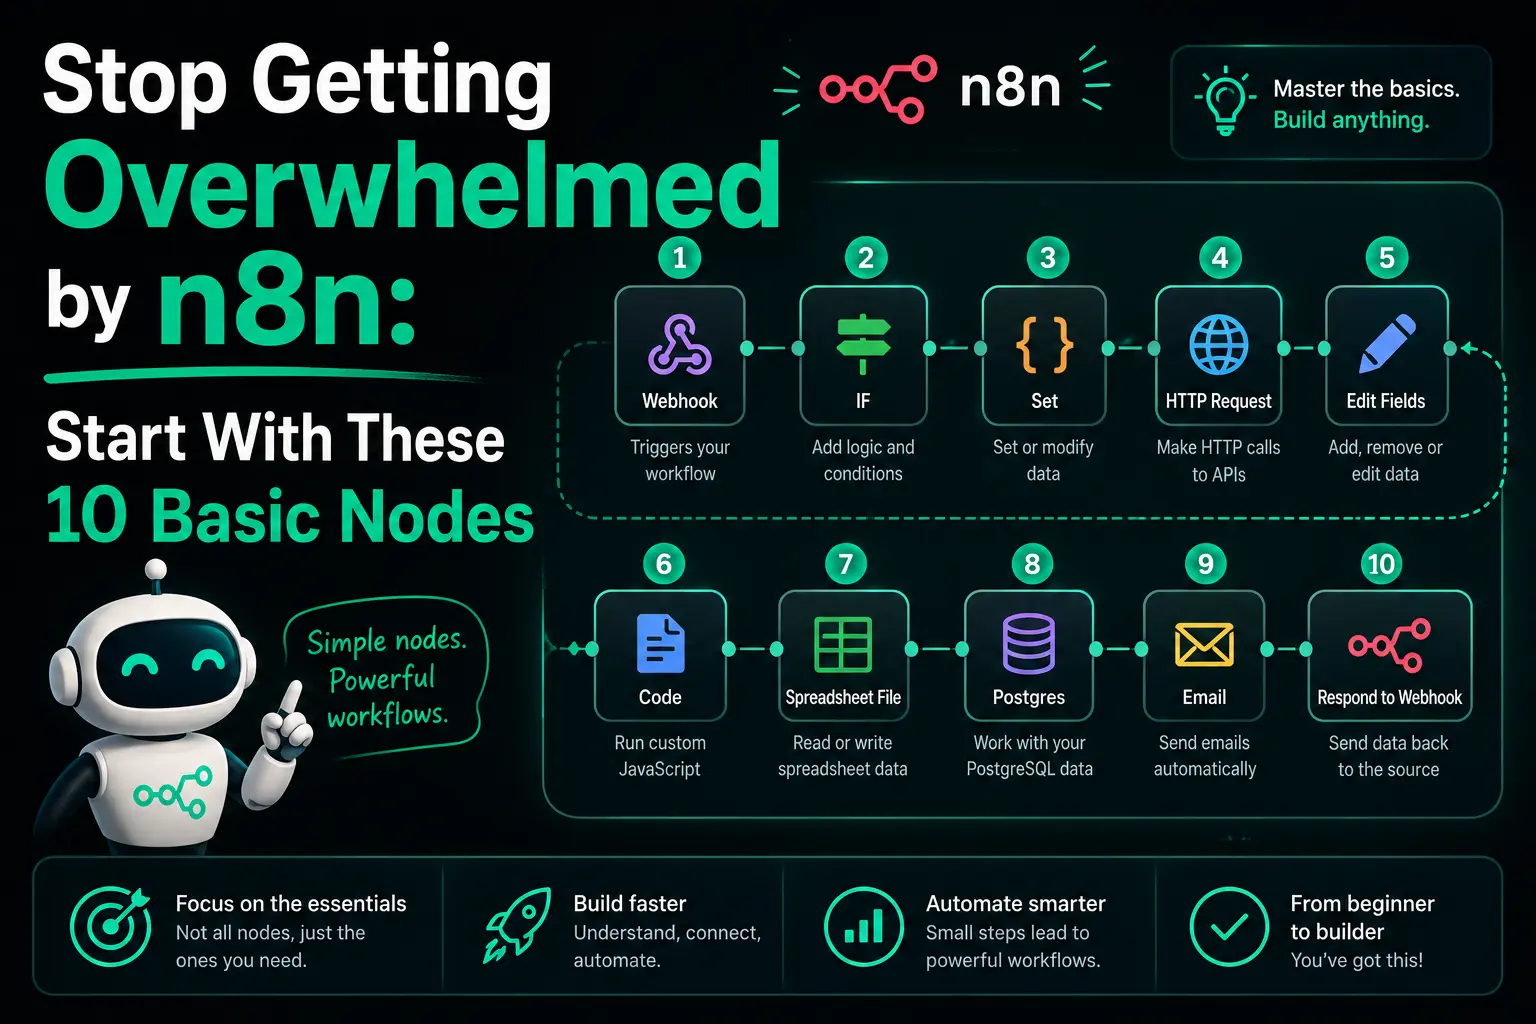
Here’s the uncomfortable truth nobody tells beginners: you don’t need to learn n8n nodes. You need to learn 10 of them. Just 10. The rest are variations of the same patterns, and you’ll pick them up naturally when you actually need them. I’ve personally shipped automations handling over a hundred thousand executions a month, and I swear I use maybe 15-20 nodes total across all my workflows.
If this is the first time we’re meeting, I’m axiomcompute. I’ve been building on n8n for a while now — everything from simple cron jobs to multi-agent AI clusters. In earlier posts we covered building a WhatsApp lead agent, using webhooks properly, and adding AI the right way. Today we go back to basics. These are the 10 nodes I wish someone handed me on day one.
The Mental Model: Nodes Are Just Three Types
Before we jump in, here’s the single insight that made n8n click for me. Every node, no matter how fancy, falls into one of three categories:
- Triggers — they start a workflow. Nothing happens in n8n without a trigger.
- Actions — they do things. Send emails, fetch data, write to a database, call an API.
- Logic / Utility — they don’t talk to the outside world. They shape, route, or transform data inside the workflow.
That’s it. 400 nodes, three categories. Once you see the panel through this lens, the overwhelm starts fading. Now let’s walk through the 10 nodes worth mastering first.
1. Manual Trigger — Your Testing Best Friend
The Manual Trigger is how every beginner should start. You click “Execute Workflow” and it runs. That’s the entire node. It exists purely so you can test logic without waiting for real events.
Every single workflow I build starts with Manual Trigger, even if the final version will use a webhook. I build the whole flow end-to-end with fake data through Manual Trigger, then swap it for the real trigger once the logic works. This habit alone will save you hour’s of debugging.
When to graduate away from it: once your workflow logic is stable and you need real-time or scheduled execution, replace it with Webhook or Schedule Trigger.
2. Webhook — The Gateway to the Internet
The Webhook node turns your workflow into a URL that external services can call. Form submissions, payment events, chat messages, GitHub pushes — anything that can make an HTTP request can trigger your workflow.
There’s a full breakdown in our n8n webhooks beginner guide, but the short version: pick an HTTP method (usually POST), set a path, configure authentication, and choose how to respond. Done.
Common beginner trap: confusing Test URL with Production URL. Test URL only listens for one request and only when you click “Listen for Test Event”. Production URL is always live but only after you activate the workflow. Forget activation and you’ll spend 30 minutes convinced n8n is broken. Been there.
3. Schedule Trigger — Cron Without the Cron Syntax
Schedule Trigger runs your workflow at intervals or specific times. Daily digests, hourly syncs, weekly reports — all start here. What I love about it is you don’t need to remember cron syntax (0 */6 * * * and friends). The UI lets you pick “every X hours” or “at 9am on weekdays” in plain English.
One thing worth knowing — Schedule Trigger fires based on your n8n server’s timezone. If you’re self-hosting, set the GENERIC_TIMEZONE environment variable explicitly. I learned this after a “daily at midnight” workflow started running at 5:30am because my server was on UTC. Small detail, big confusion.
4. HTTP Request — The All-Rounder
If a service has a public API and n8n doesn’t have a dedicated node for it, HTTP Request is your answer. GET, POST, PUT, PATCH, DELETE — everything. I’d estimate around 40 percent of my production workflows have at least one HTTP Request node.
This is the node that turns n8n from “integrations tool” into “genuinely unlimited automation platform”. Any REST API on the internet becomes a step in your workflow.
Settings worth knowing from day one:
- Authentication — set it up via n8n credentials, never paste tokens directly in the URL
- Send Body — JSON for modern APIs, Form Data for file uploads, Form URL Encoded for old-school APIs
- Response → Include Response Headers — turn this on when debugging, off for production
- Options → Retry on Fail — set to 3 retries with exponential backoff for flaky third-party APIs
Pro move: when an API is misbehaving, check the actual raw response using webhook.site or httpbin.org before blaming n8n. Nine times out of ten, the API is returning something unexpected that n8n is handling correctly.
5. Code — When Logic Gets Real
The Code node runs JavaScript or Python on the items flowing through your workflow. Scary for non-developers, but the truth is you only need three patterns to cover 90 percent of cases.
Pattern 1 — Transform each item:
return items.map(item => ({
  json: {
    name: item.json.name.trim(),
    email: item.json.email.toLowerCase(),
    processed_at: new Date().toISOString()
  }
}));
Pattern 2 — Filter items:
return items.filter(item => item.json.score >= 70);Pattern 3 — Combine fields into one object:
const first = items[0].json;
return [{
  json: {
    fullName: `${first.firstName} ${first.lastName}`,
    source: 'contact_form'
  }
}];
Memorize these three. That’s the Code node, 90 percent covered.
Real tradeoff to admit: Code nodes are powerful but they’re also the hardest to debug, hardest for teammates to read, and they break silently when input shape changes. If Set node can do the job, use Set node instead. Save Code for when you truly need logic.
6. Set — The Quiet Hero
The Set node (newer versions call it “Edit Fields”) lets you add, rename, or remove fields visually. No code. It looks boring, and that’s exactly why it’s underrated.
Use cases I reach for Set constantly:
- Building a clean output object before saving to database — only the fields you want, renamed sensibly
- Adding constants like
source: "website"orenvironment: "production" - Stripping out sensitive fields before sending data to third-party services
- Formatting dates, numbers, or strings using n8n’s built-in expressions
Once you get comfortable with Set, you’ll find most of your “I need a Code node” moments disappear. It’s a quieter tool, but it keeps workflows readable.
7. IF — The Binary Decision Maker
The IF node splits your workflow into two paths based on a condition. True path goes one way, False path goes another. Simple, ubiquitous, essential.
Real examples from my workflows:
- If lead score is over 70 → alert sales team. Otherwise → just log it.
- If email ends in
@company.com→ tag as employee. Otherwise → treat as customer. - If API returned status 200 → continue. Otherwise → trigger error handler.
The one mistake I see constantly: people forget that both branches still produce output. If something downstream only connects to the True branch, data from the False branch is silently dropped. Fine if that’s intentional. Disaster if it isn’t. Always ask yourself: “do I care about the other branch too?”
8. Switch — IF’s Bigger Sibling
When you have three or more outcomes, stop chaining IF nodes. Use Switch. It evaluates one input against multiple conditions and routes to a different output per match.
I used this heavily in our WhatsApp lead agent — a single Switch node routed messages by intent (buy, pricing, demo, support, greeting, default). The alternative would have been five nested IF nodes, a visual mess nobody wants to maintain.
Quick rule of thumb: 2 outcomes → IF, 3+ outcomes → Switch. That’s it.
9. Merge — The Reconnector
Whenever you split a workflow with IF or Switch, you often need to bring it back together. That’s Merge’s only job. Without it, downstream nodes receive data from whichever branch executed, which is almost never what you want.
Merge has three modes you’ll actually use:
- Append — stacks data from both inputs one after another. Great for reconnecting branches of an IF.
- Merge By Key — joins two streams on a matching field. Like a SQL join.
- Combine — pairs items by position. Useful when you ran two parallel HTTP calls and need to combine results row by row.
This is probably the single most underused node among beginners. Forgotten Merges are behind maybe 30 percent of “my workflow is acting weird” problems I debug for people.
10. Respond to Webhook — Talk Back to the Caller
If your workflow is triggered by a Webhook, often the caller expects a response. Respond to Webhook lets you send back a custom status code, headers, and body — usually a JSON confirmation.
Example from a contact form workflow I built last year:
Status Code: 200
Body (JSON):
{
  "success": true,
  "message": "Thanks, we'll get back to you within 24 hours",
  "ticket_id": "{{ $json.id }}"
}
Two things to remember. First, on the Webhook node, set “Respond” to “Using Respond to Webhook Node” — otherwise the Webhook responds immediately and your Respond node does nothing. Second, you can have multiple Respond to Webhook nodes in different branches to send different responses based on what happened.
Putting It Together: A Real Mini-Workflow
Let’s say you want to build a simple lead capture endpoint — accept form submissions, validate them, save high-quality leads to a database, and respond to the form. Here’s the node chain using just what we’ve covered:
| Step | Node | What It Does |
|---|---|---|
| 1 | Webhook | Receives POST from form with name, email, message |
| 2 | Set | Cleans fields — trim name, lowercase email, add source |
| 3 | IF | Is message longer than 10 characters? (basic spam filter) |
| 4a | HTTP Request | TRUE branch: POST the lead to your CRM API |
| 4b | Set | FALSE branch: mark as spam for logging |
| 5 | Merge | Reconnect both branches |
| 6 | Respond to Webhook | Send 200 with confirmation JSON |
Six nodes. One real workflow that could handle thousands of form submissions. Zero integration nodes needed. This is the point I want to drive home — you can go remarkably far with just the basics.
The Nodes I Deliberately Left Out (And Why)
Being honest about what this list skips, because good advice means admitting tradeoffs:
- Integration nodes (Gmail, Slack, Notion, etc.): they’re variations of HTTP Request with pre-built auth. Once you know HTTP Request, you can figure any of them out when needed.
- AI / LLM nodes: powerful but a separate rabbit hole. Covered them in the OpenAI/LLM nodes post — come back here first, then go there.
- Database nodes (Postgres, MySQL): important but need a database first. See the Postgres setup guide when you’re ready.
- Error Trigger: vital for production, but premature until you have something actually running in production. Add it after your first workflow goes live.
Common Mistakes I See Every Beginner Make
- Chasing integrations instead of logic: spending three hours getting the perfect Gmail node working when a plain HTTP Request would have shipped in 20 minutes.
- Code node by default: reaching for JavaScript when Set node would do it faster and be readable to future-you.
- Skipping the test phase: activating a webhook workflow and testing in production. Use Test URL, verify the data shape, then flip to Production URL.
- Not reading node output: n8n shows you exactly what each node outputs after execution. Click through every node after a test run. It teaches you faster than any tutorial.
- Forgetting Merge after branching: mentioned above, but worth repeating because it breaks so many workflows silently.
Where to Go After These 10
Once these 10 feel natural — and this takes most people a week or two of real building — the next layer depends on what you’re trying to do:
- Building real APIs and endpoints: deepen your understanding via the webhooks guide
- Storing data: pick up Postgres via the Neon Postgres setup
- Hosting for yourself: follow the VPS self-hosting guide
- Adding intelligence: the OpenAI/LLM nodes the right way post goes deep on prompt design
- Going production-ready: don’t skip the security hardening guide
For deeper reference on individual nodes, the official n8n core nodes documentation is genuinely well-written and worth bookmarking.
Wrapping Up
Looking back at my own journey with n8n, the biggest unlock wasn’t learning more nodes. It was realizing I didn’t need to. Trigger, Action, Logic. Three categories. Ten nodes to start. That mental compression is what turns overwhelm into momentum.
If you build just one workflow using only the 10 nodes covered here — even something small, like a scheduled job that posts daily stats somewhere — you’ll understand n8n better than someone who spent a week watching tutorials about every integration. Building beats watching. Every time.
My only real advice from shipping automation in production: start smaller than feels useful, ship it end-to-end, then iterate. The workflow you can maintain six months from now is always more valuable than the clever one you built in a weekend and forgot.
Questions, workflow templates, or stuck somewhere specific — I’m at admin@techmov.in. Next post we’ll go a layer deeper into building maintainable workflows once you’ve got the basics flowing.
The 10 nodes every beginner should master first are: Manual Trigger, Webhook, Schedule Trigger, HTTP Request, Code, Set, IF, Switch, Merge, and Respond to Webhook. With these alone you can build around 80 percent of real-world automations before ever touching specialized integration nodes.
No. n8n is a low-code tool designed so non-developers can build automations visually. The only slightly tricky node is the Code node, and even that can be skipped for most simple workflows. If you can understand if-else logic and JSON, you can build real production workflows within a week of focused practice.
Set node lets you add, modify, or remove fields using a simple visual interface — no code needed. Code node lets you write JavaScript or Python for complex data transformations. Use Set for quick field updates, Code only when logic gets complicated enough that the visual interface starts feeling limiting.
Use IF when you have two outcomes (true or false). Use Switch when you have three or more possible routes, like classifying a message as sales, support, or spam. Switch keeps your workflow visually cleaner than chaining multiple IF nodes together.
Most commonly because branches are not re-joined before the next step. When you split a flow using IF or Switch, you usually need a Merge node to combine the outputs again before sending them onward. Without Merge, downstream nodes often receive data from only one branch, causing unpredictable behavior.